- tl;dr
- Two DBs, One TX, No Problem
- Prerequisites
- The (rather artificial) Use Case
- The Solution
- Conclusion
- Caveat
tl;dr
You’re in a hurry to set up your chained transaction manager and have no time to go through this tutorial? Just read the code, using OrderProcessorService as an entry point. For the validation of the chained transaction logic via Unit test, have a look at OrderProcessorServiceTransactionHandlingTest.
Two DBs, One TX, No Problem
I was recently confronted with a scenario that required a Spring Boot application to manipulate information spanning two different SQL databases: this meant that one business entity lived in both databases at the same time. This posed a slight problem regarding data consistency: should any write operation to either one of the databases fail, then the system had to be rolled back to its previous state – in both databases.
As it turns out, this issue is rather easily tackled using Spring and its assorted data and transaction handling libraries, through configuration alone. Easy, once you’ve dug through the documentation, half of StackOverflow and Spring’s source code, that is.
In order to spare others and my future self the misery of having to do this painstaking research again, I’ve put together a step-by-step guide with the solution to this challenge.
The source code can be found here, on github and goes hand in hand with the explanations provided in this post. Once you’ve read this text, you should be able to easily understand the code; opening the code in a window parallel to this will make cross-referencing information a lot easier.
Prerequisites
A decent level of familiarity with the Spring Framework in general is required if you want to delve into the technical intricacies of this tutorial. Some basic knowledge of JPA – particularly JPA entities – is also necessary.
The (rather artificial) Use Case
Let’s start by defining a simple – albeit slightly artificial – business case, that we’ll use to guide ourselves along throughout this tutorial:
A customer places an order with our Fictitious Online Retailer, by invoking a service with their Order. The retailer’s application then forwards the received order to two different departments:
- AccFin, which handles the payment, and the
- Warehouse, which handles the shipping.
The app does this by writing directly into the respective department’s database instance. The two DBs are completely separate from one another, and they have different views on what constitutes an order.
![]()
Note: The demo application on github does not implement the REST Controller
From a business perspective, it would be an absolute disaster if a new order were saved to only one of the two DBs, due to one system being temporarily unavailable or different failures, such as a constraint violation or a bug in your code. This would result in either the company processing a payment and never shipping the items ordered, or shipping items without having received payment.
In order to avert any of these – admittedly, somewhat artificial – scenarios, the retailer’s application needs to make sure that the order is either successfully persisted to both DBs or neither.
The Solution
One way of solving this challenge in our Spring-Data enabled application, is by using Spring’s ChainedTransactionManager
Enabling transaction management across both data sources can roughly be thought of as a three stage process:
- We’ll first need to create the two individual Spring data sources, each with their own configuration and JPA repositories, living in their own Java packages, with their very own TransactionManagers.
- In the second step, we’ll group the new datasource-specific TransactionManagers together, using a ChainedTransactionManager.
- Finally, we’ll be instructing our order processing code to use the new ChainedTransactionManager for – you’ve probably guessed it – handling transactions.
1. Defining the Data Sources
For our example we’ll be using properties-based datasource definitions to set up our two JDBC connections. A more in-depth guide for setting up a single datasource can be found on baeldung.com/spring-boot-configure-data-source-programmatic.
Externalising Connection Information
We’ll start out by creating our application.properties like so:
#datasource config for our accounting warehouse database
spring.datasource-warehouse.driver-class-name=org.mariadb.jdbc.Driver
spring.datasource-warehouse.jdbc-url=jdbc:mariadb://localhost:3306/warehousedb
spring.datasource-warehouse.username=warehouse_user
spring.datasource-warehouse.password=789

#datasource config for our accounting database
spring.datasource-accounting.driver-class-name=org.mariadb.jdbc.Driver
spring.datasource-accounting.jdbc-url=jdbc:mariadb://localhost:3308/accountingdb
spring.datasource-accounting.username=accounting_user
spring.datasource-accounting.password=345
The one thing to watch out for here are the two different prefixes that help us keep the two data sources separate:
- spring.datasource-warehouse.
- spring.datasource-accounting.
Your prefixes can be whatever you like them to be. They don’t have to contain the string datasource. I decided to use
spring.datasource- to stick close to Spring convention. Other than that, it’s business as usual: we set the JDBC
driver’s class name, the JDBC URL and the credentials for the respective data sources.
Creating the actual DataSource Beans via Spring @Configuration
Now that we have our properties pointing to our DB, it’s time to use them to create the two DataSources, that we will be
using in our code. To do this, we’ll be using @Configuration annotated Java classes, whose methods will be invoked during application
startup to generate the necessary beans.
Have a quick look at the two *DataSourceConfig files in the sample project here.
Since we want to keep the two DBs neatly separated from one another in our code base, we’re using two different configuration classes:
AccountingDataSourceConfig and WarehouseDataSourceConfig. For the sake of brevity, we’ll only analyse the
anatomy of one DataSourceConfig class. See inline comments below for an explanation of what each element does:
@Configuration
// tells the Spring Framework that this class contains configuration.
@PropertySource({"classpath:application.properties"})
// any properties referenced within this class are to be read from the file
// application.properties
@EnableJpaRepositories(
        basePackages = "de.metamorphant.demo.spring.transactions.dao.accounting.repositories",
        entityManagerFactoryRef = "accountingEntityManagerFactory",
        transactionManagerRef = "accountingTransactionManager"
)
// Look for JPA Repository definitions in the package
// 'de.metamorphant.demo.spring.transactions.dao.accounting.repositories' and its subpackages.
// Use the EntityManagerFactory bean named 'accountingEntityManagerFactory' defined further down
// Use the TransactionManager bean named 'accountingTransactionManager' defined in this class

public class AccountingDataSourceConfig {

    @Autowired
    private Environment env;

    @Bean
    public LocalContainerEntityManagerFactoryBean accountingEntityManagerFactory() {
        LocalContainerEntityManagerFactoryBean em
                = new LocalContainerEntityManagerFactoryBean();
        em.setDataSource(accountingDataSource());
        em.setPackagesToScan(
                new String[]{"de.metamorphant.demo.spring.transactions.dao.accounting.model"});

        HibernateJpaVendorAdapter vendorAdapter
                = new HibernateJpaVendorAdapter();
        em.setJpaVendorAdapter(vendorAdapter);
        HashMap<String, Object> properties = new HashMap<>();
        properties.put("hibernate.hbm2ddl.auto",
                env.getProperty("spring.jpa.hibernate.ddl.auto"));
        em.setJpaPropertyMap(properties);

        return em;
    }

    /** In the method accountingEntityManagerFactory(), the EntityManagerFactory tells Spring two
    very important things:
      - where our entities live (.setPackagesToScan(...)), and
      - which datasource to use for said entities. (.setDataSource(...))

    The entities are our Java classes that map onto our DB table entries. Spring finds the
    entities by searching for classes that are marked as @Entity within the provided package.

    The referenced datasource is defined as a Spring Bean further down in this class and
    references the physical accounting database.

    We have thus instructed our application to direct all JPA queries involving JPA entities
    from within the package 'de.metamorphant.demo.spring.transactions.dao.accounting.model' to
    the physical Accounting database, defined by our properties that start with
    spring.datasource-accounting.

    Other hints specific to our JPA-Provider - in this case Hibernate - can also be added here,
    such as 'hbm2ddl.auto'. We take the value of our custom property from our
    application.properties and map it to the key that hibernate actually expects, called
    'hibernate.hbm2ddl.auto'. This has little to no relevance for our actual goal though, so
    let's just skip it. */

    @Bean(name = "accountingDataSource")
    @ConfigurationProperties(prefix = "spring.datasource-accounting")
    public DataSource accountingDataSource() {
        return DataSourceBuilder.create().build();
    }

    /** In the method above, we instruct Spring to create a new DataSource instance, based
    on the properties that we have added to our 'application.properties' that start with
    the prefix 'spring.datasource-accounting'. Spring now knows via convention which
    URL, JDBC-Driver and credentials to use. This means, the part of the property key after
    the prefix has to be exactly what Spring expects it to be, e.g. 'username' or 'jdbc-url'
    Changing the credentials or the DB URL now becomes a simple matter of editing the
    appropriate entries in 'application.properties'.

    This method creates a Bean called 'accountingDataSource' than can be referenced from
    anywhere within the Spring context. We reference it in the method above, when
    creating our EntityManagerFactory.*/

    @Bean(name = "accountingTransactionManager")
    public PlatformTransactionManager accountingTransactionManager() {
        JpaTransactionManager transactionManager
                = new JpaTransactionManager();
        transactionManager.setEntityManagerFactory(
                accountingEntityManagerFactory().getObject());
        return transactionManager;
    }

    /** The TransactionManager is the bean that handles transaction lifecycles within
    our code -- it creates and starts them where necessary, it commits or rolls them back,
    without us, the developers, having to pay too much attention to this. We can alter the
    default transaction handling behaviour in our code if we need to, though.

    In order to create a TransactionManager we need a reference to our EntityManagerFactory,
    which, in turn, contains the reference to our 'accountingDataSource', which references
    our actual DB.

    Here we've defined the TransactionManager for our Accounting Database. It can be referenced
    from within our code, whenever necessary, via its bean name: 'accountingTransactionManager'

    */
}
To recapitulate: we’ve configured our dataSource, which gets used by the entityManagerFactory, which in turn gets used by our transactionManager. They also reference 2 further artifacts via package scanning:
- the location of our JPA Repository
- the location of our JPA Entities
The latter two are the actual elements that we will be actively using in our code in order to interact with the DB.
The following screenshot shows the package structure for the repos and entities:
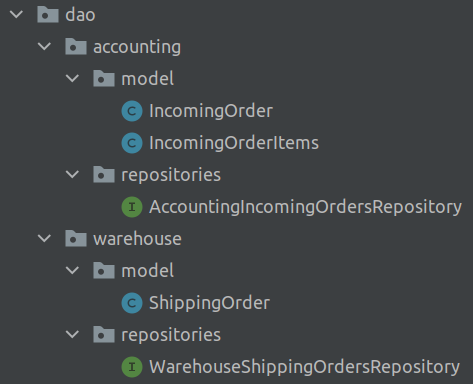
This structure allows the other WarehouseDataSourceConfig class and all its referenced Repository and Entity classes to cleanly coexist alongside our Accounting persistence layer. The Warehouse Repo and Entity will persist data to and retrieve data from the physical database configured using the properties prefixed with spring.datasource-warehouse.
As such, when we invoke
WarehouseShippingOrdersRepository.save(ShippingOrder so)
it will get persisted to a different database than
AccountingIncomingOrdersRepository.save(IncomingOrder io).
2. Defining the ChainedTransactionManager
Now that we’ve laid the groundwork enabling our application to interact with two different data sources, without burdening the business logic layer with any added complexity, we’re ready for the next step:
Make our app treat compound operations, involving both data stores, as one distributed transaction. To do so, we will create a new TransactionManager using an @Configuration-annotated class called MultipleDatasourceTransactionManagerConfig:
@Configuration
public class MultipleDatasourceTransactionManagerConfig {

    @Bean(name = "chainedTransactionManager")
    public ChainedTransactionManager chainedTransactionManager(
            @Qualifier("accountingTransactionManager")
                    PlatformTransactionManager accountingTransactionManager,
            @Qualifier("warehouseTransactionManager")
                    PlatformTransactionManager warehouseTransactionManager ){
        return new ChainedTransactionManager(accountingTransactionManager,warehouseTransactionManager);
    }

}
This will create a new TransactionManager – as a named bean called chainedTransactionManager – that encompasses
the two TransactionManagers that we have declared earlier:
- warehouseTransactionManager
- accountingTransactionManager
We reference the two by means of their bean names and create a new bean of the type ChainedTransactionManager.
The JavaDoc of the ChainedTransactionManager
contains some additional information that you might find useful.
3. Using the new ChainedTransactionManager
This new compound TransactionManager has now to be explicitly used, wherever we need distributed transactions in our app. The one and only example for this in our demo web-app is the method OrderProcessorService.createOrder.
@Component
@EnableTransactionManagement
public class OrderProcessorService {
    @Autowired
    private OrderTransformer<IncomingOrder> incomingOrderTransformer;

    @Autowired
    private OrderTransformer<ShippingOrder> shippingOrderTransformer;

    @Autowired
    private WarehouseShippingOrdersRepository shippingOrdersRepository;

    @Autowired
    private AccountingIncomingOrdersRepository incomingOrdersRepository;

    @Transactional(value = "chainedTransactionManager",
            rollbackFor = {Exception.class},
            isolation = Isolation.READ_UNCOMMITTED)
    public void createOrder(Order order) throws TransformationException {
        IncomingOrder incomingOrder = incomingOrderTransformer.transformOrder(order);
        incomingOrdersRepository.save(incomingOrder);

        ShippingOrder shippingOrder = shippingOrderTransformer.transformOrder(order);
        shippingOrdersRepository.save(shippingOrder);
    }
}
As you’ve probably guessed, the line
@Transactional(value="chainedTransactionManager", rollbackFor={Exception.class}, isolation = Isolation.READ_UNCOMMITTED)
is where the magic happens. It’s
here that we instruct Spring to span a transaction around the entire method. Since this method handles both write operations
to both DBs, we want our new transaction to start before method execution commences, and commit as soon as the method has
been successfully executed. Should the method execution result in an Exception – or any of its subclasses – being thrown,
a rollback is triggered for both entities.
And we’re done.
Test for the Worst Case
…but not so fast!
Here is a short cautionary tale, illustrating the need of listening to your parents. They probably told you when you were young: never trust a stranger and always wear clean undies. Since this is just a blog post written by some random person on the interwebs, it might very well be ridden with errors – intentional or otherwise – that might very well result in a Prod incident that turns your whites to brown. It’s therefore best to double check that the code provided actually does what it’s meant to do. Let’s write a unit test that ensures our code actually behaves as expected and rolls back the DB state in case of an Exception.
For our tests we will be using embedded H2 databases. We do this, by creating a new application.properties in our Maven project’s test/resources folder, like so, pointing to two different H2 instances.
Let’s cause an exception
Since we want to test the behaviour of our chainedTransactionManager, we’ll be exercising the method shown above –
OrderProcessorService.createOrder(). The method does two things: it transforms the business entity Order to
the two entities required by our two databases, and persists each one.
For the purpose of this test, we’ll make sure the first transformation and persisting operation goes smoothly, thus resulting in an uncommitted write to the first Accounting DB.
We’ll then break the second part of the logic, by causing an Exception to be thrown. To do this,
we’ll mess up the shippingOrderTransformer on purpose.
One way of doing this, is to supply the Spring context with an alternative implementation of the ShippingOrderTransformer. This particular implementation, called BrokenShippingOrderTransformer just throws a TransformationException whenever invoked.
Here is the test class OrderProcessorServiceTransactionHandlingTest that starts up the entire Spring-Boot application, swapping out the implementation of shippingOrderTransformer at runtime with an instance of BrokenShippingOrderTransformer.
@SpringBootTest
@DirtiesContext(methodMode = DirtiesContext.MethodMode.AFTER_METHOD)
class OrderProcessorServiceTransactionHandlingTest {

    @TestConfiguration
    @Import(SpringTransactionsApplication.class)
    public static class TestConfig{

        @Bean("shippingOrderTransformer")
        @Primary
        public OrderTransformer<ShippingOrder> shippingOrderTransformer(){
            return new BrokenShippingOrderTransformer();
        }
    }

    @Autowired
    private OrderProcessorService orderProcessorService;

    @Autowired
    private WarehouseShippingOrdersRepository shippingOrdersRepository;

    @Autowired
    private AccountingIncomingOrdersRepository incomingOrdersRepository;


    @Test
    void givenEmptyDatabase_whenCreateOrder_thenDataIsPresentInBothDBs()
                                                    throws TransformationException {
        //given
        Order order = createOrder();

        //when
        try {
            orderProcessorService.createOrder(order);
        } catch (TransformationException te){
            //ignore exception since we're interesting in the state of the database
        }

        //then
        List<ShippingOrder> createdShippingOrders = shippingOrdersRepository.findAll();
        List<IncomingOrder> createdIncomingOrders = incomingOrdersRepository.findAll();


        assertThat(createdShippingOrders, emptyCollectionOf(ShippingOrder.class));
        assertThat(createdIncomingOrders, emptyCollectionOf(IncomingOrder.class));

    }

    private Order createOrder() {
      // [...] omitted for brevity
    }

}
The substitution magic described above happens in the nested class TestConfig that is annotated with
@TestConfiguration. The @Test method then
goes on to execute orderProcessorService.createOrder() which fails after the first <repository>.save() operation,
thus resulting in a complete rollback of the state in both DBs. We check for this by asserting that both DBs are still
devoid of data.
Congratulations, you’re done! You have earned yourself that spritzer.
Conclusion
Whenever possible, avoid having one Spring Boot application using transactions spanning multiple data sources, as this just causes complications on numerous levels. Should this however prove unfeasible for you or your use case, then the ChainedTransactionManager is about as plug-and-play of a solution as it gets. Once you get the configuration part done, it’s simply a matter of telling your app via annotations at the method level, where to apply the new chained transaction handler, and voilà.
Caveat
The example code is there purely for illustrative purposes. Please refrain – to the best of your abilities – from copy-pasting larger structures or entire layers into your productive code. The dependencies between the various classes and layers are rather dirty and reflect the hit-and-miss nature of the creation process: I was trying to reach the elusive Ballmer Peak. You be the judge of whether I’ve succeeded or not and let me know what you think in the comments below.
Post header background image by holdosi from Pixabay.